DISCLAIMER: This is a solution that I've used successfully. The instructions below are offered in good faith but please understand that you follow them at your own risk. Manufacturers stopped making the original Philips 6604 bulb for the early Leitz V35 enlargers years ago. Since then, the only solution I'm aware of has been to replace the lamp holder with a modified one that permits the use of a Philips 13139 or similar bulb. That works fine but is a very expensive fix costing over £100 if I remember correctly for the specially machined part that replaces an original part and accepts the 13139 bulb.
I believe I may now have an alternative solution and it's left me surprised that no one else seems to have thought about it or written it up for the internet - at least, I can't find any mention of it. The halogen lamp used in the V35 consists of a halogen capsule with a longitudinal filament held in place in the reflector by some heat resistant cement or similar material.
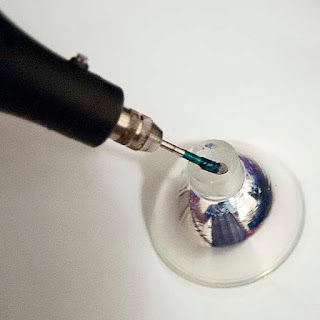
 |
| A tight fit. |
If you have a lamp with a broken filament, it's the work of just a couple of minutes with a watchmaker's screwdriver, or some other sharp, pointy object, to dig out the old and probably crumbly cement and remove the spent halogen capsule. You're then left with the reflector with no capsule but a hole in the bottom where the capsule used to be. What you then have to do is find a replacement halogen capsule and these are still available for just a few pounds and have a lifespan of around 2000-4000 hours. The specification you're looking for is a 12V/75W halogen capsule with the GZ6.35 or GY6.35 twin pin fitting and longitudinal filament. The original bulb had the GZ6.35 fitting but the GY6.35 also fits. The GZ pins are 1mm wide and the GY's are 1.25mm so it might be a tight squeeze but they should go in the ceramic bulb holder. The 6.35 refers to the distance between the pins in mm.
 |
| Carefully does it! |
Now, the problem is likely to be that the new halogen capsule will not fit in the reflector. The aperture at the back end of the reflector is just around 10mm wide. The replacement capsules I got were 12mm wide at their base. You might get lucky and find a capsule that will fit but, in most cases, I'd expect that you'd have to do what I did - remove some material from the reflector to widen the aperture. This can be a tricky operation since you'll be working with hard glass and either a narrow file or a dremel-type tool. If you try to take off too much in one go there's every chance you'll crack the glass around the aperture and that spells curtains. Should that happen, just chalk it up to experience as you're no worse off than when you started.
 |
| Prongs should stick out about this far. | |
|
I used a dremel tool that I bought in Lidl about ten years ago and which is still working despite spending most of the time lying in an old shed. Ideally, the drill bit should be diamond-tipped as you need something with a bit of bite to make much of an impression on the glass. I took about twenty minutes to gently widen the aperture, pausing from time-to-time to let the glass cool down. Wear a mask when you're doing this as you don't want to breathe in powdered glass. You have to remove enough material to enable the capsule to slide quite a way into the reflector so that the pins stick out far enough to engage with the ceramic bulb holder.
 |
| All cemented up. |
Once this has been accomplished, it's time to cement the capsule in place. A 500g tub of fire resistant cement, the type used to plug gaps around stove pipes, was less than £4 in Wickes and I reckon you'd be able to do about 500 bulbs with that amount should you live that long. Alternatively, I'm sure a friendly heating installer or even a woodburning stove shop would give you a small dab for nothing if you asked nicely. Using a narrow screwdriver, I scooped up some cement about half the size of a pinky nail and pushed it into the aperture from the rear (no jokes, please) until it just started protruding into the reflector area.
 |
| Battle-scarred but working! |
Holding the halogen capsule in a cloth to keep finger oil off it (never touch the glass on the capsule with a bare finger as it can shorten its lifespan), I pushed it into the aperture from the front taking care to put a finger over the back to stop it pushing most of the cement out. Once the capsule is seated in place as centrally as possible, wipe all cement off the back of the reflector and off the twin prongs. Have a look through the front of the reflector to see if any cement has stuck to the business end of the capsule and gently remove it. Now it's just a case of waiting for the cement to harden.
Hopefully, you now have a fully-functioning lamp and will be able to fire up the old V35 again. I bought my V35 a few years ago but only managed to make one or two prints before the bulb popped. I can't remember what exposure times I was getting then but the "new" bulb gives me an exposure of around 20 seconds at f4 on the 40mm Focotar for a nine-inch long print on 10x8 paper. I suspect that's a bit more than I'd get with the original bulb but it's not really a problem.
Good luck and please feel encouraged to leave a comment below letting me know how you got on!
* If you don't fancy doing this yourself, I can do it for you for an all-in price of £20 plus postage at cost. Send me an email and I'll tell you how to proceed.


Thank you so much for sharing!!!!!!!!!!!!!!!!!!!
ReplyDeleteRegards,
Lawrie.
I'm curious about the alignment of the filament with the reflector and ensuing evenness of the light by the time it gets to the paper. I know it goes through the diffuser box and a condenser first, but still . . .
ReplyDeleteI must admit, I went mad and bought the supa-dupa adapter from the Canadian eprey seller a couple of years ago, so this fix isn't much use to me anymore -- but it could be really useful for lots of people!
Martin,
ReplyDeleteIt's not too difficult to centre the capsule in the reflector. It might not be possible to get it perfectly centred to one millimetre or less but I doubt whether anyone would notice that. As you say, there's a lot of light bouncing around before it reaches the negative.
I measured the light intensity on my baseboard and there was the usual fall-off towards the edges but it was the same all the way round.
Good to know people are still using enlargers especially the Leitz V35.
ReplyDeleteThis comment has been removed by a blog administrator.
ReplyDelete