We're lucky to have Andrew Sanderson as a reader of The Online Darkroom. When I realised this (thanks to Omar for pointing it out) I got in touch with Andrew and asked him if he would fancy writing something. Andrew will need little introduction for UK photographers but overseas readers might not be so familiar with his work. He's an Ilford Master Printer whose work has appeared on the Ilford stand at the Focus on Imaging trade exhibition for two years running.
He also works on Ilford product testing and staff training and regularly gives talks and demonstrations at colleges and universities all over the UK, teaching both tutors and students about a range of analogue techniques. He's widely published and runs workshops from his darkroom and studio in Holmfirth. He has exhibited regularly in the UK and New York, and has photographs in picture libraries in both Britain and the United States.
However, it's his position as one of the foremost exponents of paper negatives that takes pride of place here today in this guest post. Andrew has been perfecting a tricky process (How tricky? See my previous post on the subject!) for 35 years. It would be impossible to distill so many years of experience into a blog post so Andrew has offered a flavour of what he's about and would like to invite anyone interested in a comprehensive initiation into the fascinating world of paper negs to consider attending one of his workshops (details follow at the end of the post). If the photographs he's provided here don't whet your appetite then perhaps knitting would be a better pursuit...
There seems to be a lot of interest in paper negatives these days. I’ve been using this technique since the late seventies and I love the versatility of the process and the unique look that it brings. I have written many articles on using paper as a substitute for film over the years and regularly give workshops on the technique. Bruce has kindly offered me the floor here on his blog, so I’d like to share some images and insights into the process.
The only ones you might have problems with are papers which have, due to age, taken on a brown tint to the base (when seen with light shining through). This brown staining makes print times much longer and they are not worth the bother. This is only a problem if you are printing from them by contact or projection, scanning is not affected.
Working out the pre-flash exposure is not difficult. Raise your enlarger to the top of the column, stop the lens down to the middle of its range (generally about f8 or f11), put a piece of tracing paper or a 5x4 negative bag under the lens to diffuse the light, and make a series of exposures. To make it easier to see where the paper is changing tone, place a pair of scissors on the test sheet (see picture).
Begin with a series of five second exposures and if there is no tone on the developed paper, double up to ten second exposures. If you are getting tone on every section you exposed, there is too much light coming from your enlarger. Stop the lens down two more stops, and re do your test. You are aiming for a test which is white at one end and grey at the other. Count along with your exposures and see how much exposure caused the first example of pale tone. (Using an object on the paper such as a pair of scissors makes this easier to see).
When you have chosen the correct exposure to create tone, take the exposure just before that as your pre-flash exposure. Flash whatever number of sheets you are going to use and load them into your dark slides/film holders. When you have these pre-flashed sheets, use the first one to do a test exposure out of the window to check your paper speed before you go out shooting. Some claim that the pre-flash increases the speed of the paper, but you may wish to keep it the same and take advantage of the extra shadow detail.
Andrew has a book that goes more deeply into the process and which is available from Blurb.com: http://www.blurb.co.uk/b/1952208-paper-negative-photography
Further info about his workshops can be had through the contact details on his websites: www.andrewsanderson.com and www.thewebdarkroom.com
He also works on Ilford product testing and staff training and regularly gives talks and demonstrations at colleges and universities all over the UK, teaching both tutors and students about a range of analogue techniques. He's widely published and runs workshops from his darkroom and studio in Holmfirth. He has exhibited regularly in the UK and New York, and has photographs in picture libraries in both Britain and the United States.
However, it's his position as one of the foremost exponents of paper negatives that takes pride of place here today in this guest post. Andrew has been perfecting a tricky process (How tricky? See my previous post on the subject!) for 35 years. It would be impossible to distill so many years of experience into a blog post so Andrew has offered a flavour of what he's about and would like to invite anyone interested in a comprehensive initiation into the fascinating world of paper negs to consider attending one of his workshops (details follow at the end of the post). If the photographs he's provided here don't whet your appetite then perhaps knitting would be a better pursuit...
Paper negatives
by Andrew Sanderson
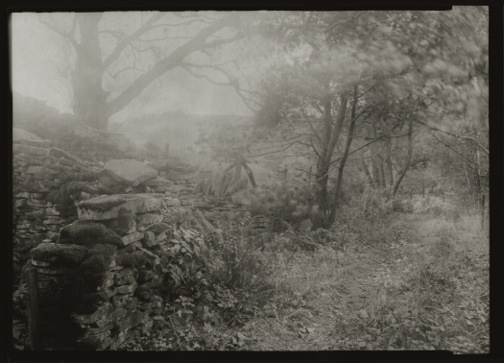 |
| Copthrust Wood |
There seems to be a lot of interest in paper negatives these days. I’ve been using this technique since the late seventies and I love the versatility of the process and the unique look that it brings. I have written many articles on using paper as a substitute for film over the years and regularly give workshops on the technique. Bruce has kindly offered me the floor here on his blog, so I’d like to share some images and insights into the process.
Paper types
One of the great things about paper negative is that there are many different types of photographic paper still around, and all have a unique look. It is not always necessary to use fresh paper, some interesting results can be achieved using papers which are too old for conventional printing. |
| Manchester |
The only ones you might have problems with are papers which have, due to age, taken on a brown tint to the base (when seen with light shining through). This brown staining makes print times much longer and they are not worth the bother. This is only a problem if you are printing from them by contact or projection, scanning is not affected.
If you can get hold of fixed grade papers which are well out of date, you will have less of a problem with contrast, as papers lose their contrast as they age. Some paperswill drop one grade over a decade or more. They might say Grade 3 on the box, but have a contrast equivalent of a Grade 2. Papers over twenty or thirty years old will have dropped even more, so see what you can find and do a bit of experimentation.
Speed
 |
| Angle Poise |
Speed
The speed of papers (the ISO setting) is not given on the box and can vary quite a lot. I have seen articles on the internet where people are claiming to rate it at 25 ISO, but personally, I think this is too high for practical use. Kentmere papers are the fastest I have encountered, Ilford Multigrade is average and Ilford Warmtone is a stop slower. Start your experiments at between 1.5 and 6 ISO.
Contrast
 |
| Pre-flash test |
Many people encounter higher contrast than they are used to when beginning with paper negatives. There are a few methods of controlling this and getting it down to manageable levels, and I don’t have room here to get too technical, but the method most use is pre-flashing. A short exposure to white light is given under the enlarger before the paper is loaded into the camera, or dark slides.
 |
| Manchester 2 |
Working out the pre-flash exposure is not difficult. Raise your enlarger to the top of the column, stop the lens down to the middle of its range (generally about f8 or f11), put a piece of tracing paper or a 5x4 negative bag under the lens to diffuse the light, and make a series of exposures. To make it easier to see where the paper is changing tone, place a pair of scissors on the test sheet (see picture).
Begin with a series of five second exposures and if there is no tone on the developed paper, double up to ten second exposures. If you are getting tone on every section you exposed, there is too much light coming from your enlarger. Stop the lens down two more stops, and re do your test. You are aiming for a test which is white at one end and grey at the other. Count along with your exposures and see how much exposure caused the first example of pale tone. (Using an object on the paper such as a pair of scissors makes this easier to see).
 |
| Weybourne |
When you have chosen the correct exposure to create tone, take the exposure just before that as your pre-flash exposure. Flash whatever number of sheets you are going to use and load them into your dark slides/film holders. When you have these pre-flashed sheets, use the first one to do a test exposure out of the window to check your paper speed before you go out shooting. Some claim that the pre-flash increases the speed of the paper, but you may wish to keep it the same and take advantage of the extra shadow detail.
Andrew has a book that goes more deeply into the process and which is available from Blurb.com: http://www.blurb.co.uk/b/1952208-paper-negative-photography
Further info about his workshops can be had through the contact details on his websites: www.andrewsanderson.com and www.thewebdarkroom.com


an interesting read for those of use curious about the process! hanks
ReplyDeleteVery interesting teaser. Wonder how to contact print paper negs; wet them with something perhaps, to increase transparency?
ReplyDeleteHi Jan,
ReplyDeleteNo need to wet them. Just put the paper neg emulsion-side together with a sheet of printing paper beneath some heavy glass. Do a test strip to determine the correct exposure and away you go. If you look at Andrew's pics you can see that the contact process has picked up the texture in the paper which adds to the effect.
Excellent I can recommend Andrews book on alternative processes to 'wet' anyone interests in investigating and exploring the world of analogue photography . so much more fun than pressing buttons on your computer.
ReplyDelete